Speech-to-text (STT), or Automatic Speech Recognition (ASR), converts spoken words into written text, automating transcription to save time and enhance accessibility across different applications. Its integration into applications can improve user experience and engagement.
Picovoice's Leopard Speech-to-Text and Cheetah Streaming Speech-to-Text are powerful STT engines that can be tailored to recognize custom vocabulary and boost the probability of specific words being detected. In this article, we will walk you through the process of creating a custom model for Leopard and Cheetah.
An equivalent video tutorial of this article is also available.
1. Picovoice Console
Sign up for a free Picovoice Console account. Once you've created an account, navigate to the Leopard & Cheetah page.

2. Create Your Custom Model
Once you're on the Leopard & Cheetah page, follow these steps to create a model:
- Click on the "New Model" button.
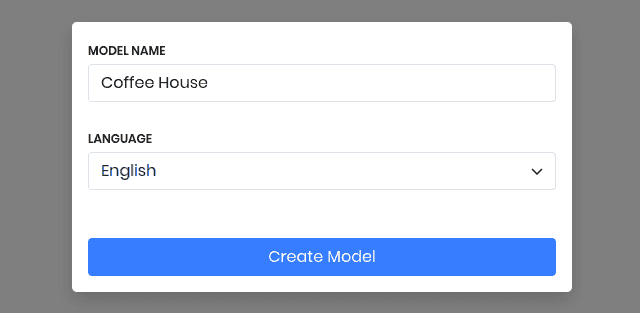
- Give your model a name.
- Select the language for your model.
- Click on the "Create Model" button.
3. Add Custom Vocabulary
After creating a model, you will be automatically redirected to an editor where you can start customizing your model. Let's start by adding custom vocabulary.
- To add custom vocabulary, simply type in the words you want to add in the
Custom Vocabularytab and hit "Enter." - Test your custom vocabulary by clicking on the microphone in the panel on the right hand side, and speaking the added words. Watch for the word in the
Transcriptionpanel below.
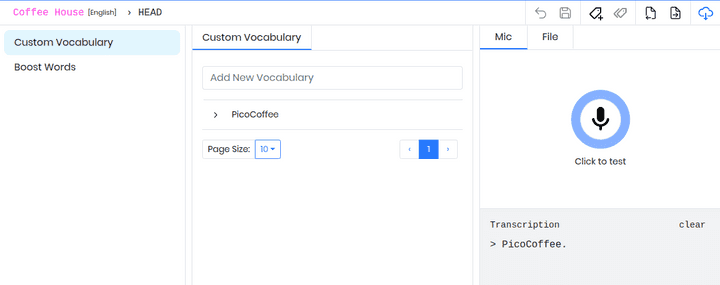
You can also test your model using audio files by clicking on the File tab. This can help maintain consistency between tests.
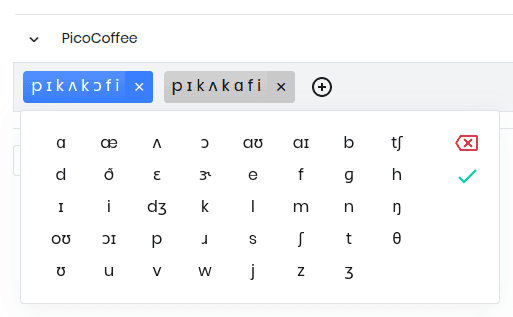
Each word you add will come with default pronunciations. While it's unlikely that these will require editing, you can click the arrow next to your custom word to toggle a dropdown that displays its pronunciations in IPA format. This allows you to add, remove, or make any necessary adjustments.
4. Increase Detection with Boost Words
Boost words are used to increase the likelihood of certain words being detected. To add a boost word, simply type it in to the Boost Words tab and hit "Enter." Boost words are useful to help Leopard or Cheetah make more informed distinctions between homophones based on your application context.

Note that any existing word can be boosted. For example, if "Thank you" is expected to be a frequently occurring phrase in your use case, go ahead and add it to your list of boost words.
5. Download your Custom Model
Once you are satisfied with your custom model, click on the blue download icon in the toolbar. By default, the model downloaded will be for Leopard. If you need real-time speech-to-text, select Cheetah instead. Click "Download", and in just a few seconds, you will find a folder in your downloads containing the .pv file for your custom model.
Next Steps
Now that you have your .pv file, you're ready to begin coding! Below is the list of SDKs supported by Leopard Speech-to-Text and Cheetah Streaming Speech-to-Text, along with corresponding code snippets and quick-start guides.
Leopard Quick Start
1o = pvleopard.create(access_key)2
3transcript, words =4 o.process_file(path)1const o = new Leopard(accessKey)2
3const { transcript, words } =4 o.processFile(path)1Leopard o = new Leopard.Builder()2 .setAccessKey(accessKey)3 .setModelPath(modelPath)4 .build(appContext);5
6LeopardTranscript r =7 o.processFile(path);1let o = Leopard(2 accessKey: accessKey,3 modelPath: modelPath)4
5let r = o.processFile(path)1Leopard o = new Leopard.Builder()2 .setAccessKey(accessKey)3 .build();4
5LeopardTranscript r =6 o.processFile(path);1Leopard o =2 Leopard.Create(accessKey);3
4LeopardTranscript result =5 o.ProcessFile(path);1const {2 result,3 isLoaded,4 error,5 init,6 processFile,7 startRecording,8 stopRecording,9 isRecording,10 recordingElapsedSec,11 release,12} = useLeopard();13
14await init(15 accessKey,16 model17);18
19await processFile(audioFile);20
21useEffect(() => {22 if (result !== null) {23 // Handle transcript24 }25}, [result])1Leopard o = await Leopard.create(2 accessKey,3 modelPath);4
5LeopardTranscript result =6 await o.processFile(path);1const o = await Leopard.create(2 accessKey,3 modelPath)4
5const {transcript, words} =6 await o.processFile(path)1pv_leopard_t *leopard = NULL;2pv_leopard_init(3 access_key,4 model_path,5 enable_automatic_punctuation,6 &leopard);7
8char *transcript = NULL;9int32_t num_words = 0;10pv_word_t *words = NULL;11pv_leopard_process_file(12 leopard,13 path,14 &transcript,15 &num_words,16 &words);1const leopard =2 await LeopardWorker.3 fromPublicDirectory(4 accessKey,5 modelPath6 );7
8const {9 transcript,10 words11} =12 await leopard.process(pcm);Cheetah Quick Start
1o = pvcheetah.create(access_key)2
3partial_transcript, is_endpoint =4 o.process(get_next_audio_frame())1const o = new Cheetah(accessKey)2
3const [partialTranscript, isEndpoint] =4 o.process(audioFrame);1Cheetah o = new Cheetah.Builder()2 .setAccessKey(accessKey)3 .setModelPath(modelPath)4 .build(appContext);5
6CheetahTranscript partialResult =7 o.process(getNextAudioFrame());1let cheetah = Cheetah(2 accessKey: accessKey,3 modelPath: modelPath)4
5let partialTranscript, isEndpoint =6 try cheetah.process(7 getNextAudioFrame())1Cheetah o = new Cheetah.Builder()2 .setAccessKey(accessKey)3 .build();4
5CheetahTranscript r =6 o.process(getNextAudioFrame());1Cheetah o =2 Cheetah.Create(accessKey);3
4CheetahTranscript partialResult =5 o.Process(GetNextAudioFrame());1const {2 result,3 isLoaded,4 isListening,5 error,6 init,7 start,8 stop,9 release,10} = useCheetah();11
12await init(13 accessKey,14 model15);16
17await start();18await stop();19
20useEffect(() => {21 if (result !== null) {22 // Handle transcript23 }24}, [result])1_cheetah = await Cheetah.create(2 accessKey,3 modelPath);4
5CheetahTranscript partialResult =6 await _cheetah.process(7 getAudioFrame());1const cheetah = await Cheetah.create(2 accessKey,3 modelPath)4
5const partialResult =6 await cheetah.process(7 getAudioFrame())1pv_cheetah_t *cheetah = NULL;2pv_cheetah_init(3 access_key,4 model_file_path,5 endpoint_duration_sec,6 enable_automatic_punctuation,7 &cheetah);8
9const int16_t *pcm = get_next_audio_frame();10
11char *partial_transcript = NULL;12bool is_endpoint = false;13const pv_status_t status = pv_cheetah_process(14 cheetah,15 pcm,16 &partial_transcript,17 &is_endpoint);1const cheetah =2 await CheetahWorker.create(3 accessKey,4 (cheetahTranscript) => {5 // callback6 },7 {8 base64: cheetahParams,9 // or10 publicPath: modelPath,11 }12 );13
14WebVoiceProcessor.subscribe(cheetah);

